 |
| A black plain pocket folder, construction paper and printed images. |
-a plain pocket folder (I just had a paper one, but if you use a plastic one, you will get more wear and tear out of it)
-computer printout of a "Now" picture, and an "All Done" picture (I used a stop sign)
-construction paper
-sticky back velcro
-various pictures of your daily routine (picture of a calendar for calendar time, a bathroom for bathroom time, your car for outings, etc) We use Board Maker to make the pictures, but if you do not have access to that, just google some images or take pictures in your home/classroom of actual items/objects and print them in small squares).
 |
| Making the "Now" and "All Done" areas of the schedule. |
-Cut rectangles of 1 or 2 colors and glue the Now picture to one, and the All Done Picture to the other. I used red and green- green for the "Now" picture (green means "go" or "start"), and red for "All Done" picture (red signifying "stop"). You can use any colors that you have around, however.
I then laminated each rectangle to make things more durable, but you don't have to. This laminator is a Scotch brand laminator that you can find at amazon.com, but I bought mine at Menards for $25.
 |
| Arrange the schedule order on the velcro strip along the bottom of the folder. |
-Attach the construction paper to the front of the folder with the folder opening up from the bottom (the crease of the folder is at the top). Add a small piece of sticky back velcro loop (fuzzy side) below each picture.
-Cut a strip of sticky back velcro loop (fuzzy side) the length of the folder, and attach it along the bottom of the folder beneath the "now" and "all done" areas. This is where you will attach the picture squares in a row that is your child's/student's schedule. My folder is black, so you can't really see the black velcro strip, but if you look carefully, you can see it between the pictures that are stuck to it.
-Cut small pieces of the velcro hook (not fuzzy side) and attach them to the back of all of the picture squares you have made. You may want to laminate each picture square or at least print them on cardstock so that they are more durable and can be reused. Arrange the pictures in the order of your schedule or routine. The cool thing is, you can change the order when you need to, because they are just velcroed on!
 |
| Make an area inside the folder to store picture cards. |
Now, you are ready to use the new visual schedule!
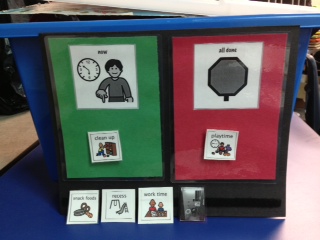 |
| Playtime is "all done," and "now" it is time for clean up. "Next" on the schedule on the strip below is snack time. |
-When you are done with that activity, move that picture under "all done," and tell the child that you are all done with that activity. Then, show him/her the next picture from the velcro strip schedule, and move it to the "Now" spot. Continue on in this manner throughout the day when you are expecting the child to change his/her routine.
This is just ONE EXAMPLE of many visual schedule options that can be used, and it can be added to or changed to meet the needs of your particular student/child. If you are a parent, there may be a visual schedule that is already being used with your child at school. Ask your child's speech therapist or occupational therapist if this is the case, and they can help you set something up for home that is a similar format to what your child is already used to using. They will likely even help you make one or set it up for you with your input.
No comments:
Post a Comment
Feel free to leave a comment!